
IPvanish is a popular VPN service offering privacy, secure browsing, and unrestricted internet access. While its features are beneficial for many, you may find yourself needing to cancel your subscription. This guide provides a comprehensive walkthrough for canceling your IPvanish subscription efficiently, regardless of the platform you used to subscribe.
Understanding IPvanish Subscriptions
Before starting the cancellation process, it’s important to understand the terms and policies of IPvanish subscriptions:
- Subscription Plans: IPvanish offers monthly and annual subscription options with auto-renewal.
- Refund Policy: Most IPvanish plans come with a 30-day money-back guarantee for new customers. Refund eligibility depends on the timing of your cancellation.
- Auto-Renewal: Subscriptions renew automatically unless canceled before the renewal date.
Knowing these details ensures a smooth cancellation process and prevents unexpected charges.
Reasons to Cancel IPvanish
Here are common reasons why users cancel their IPvanish subscription:
- Switching to another VPN provider.
- Reduced need for VPN services.
- Budgetary adjustments or financial constraints.
- Dissatisfaction with the features or performance of IPvanish.
Whatever the reason, the steps outlined below will help you cancel your subscription quickly and efficiently.
How to Cancel Your IPvanish Subscription
The cancellation process for IPvanish depends on how you subscribed. Follow the appropriate steps below for your specific platform.
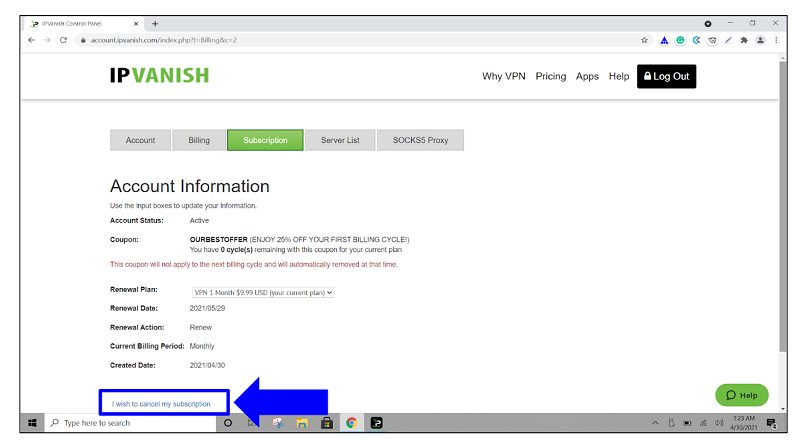
1. Canceling Through the IPvanish Website
If you subscribed directly via the IPvanish website:
- Log Into Your Account: Visit the IPvanish website and log in using your credentials.
- Navigate to Account Settings: Go to your account dashboard and find the Subscription or Billing section.
- Locate Your Plan: Click on your active subscription to view its details.
- Select Cancel Subscription: Click the Cancel Subscription button and follow the prompts to confirm your cancellation.
- Request a Refund (if applicable): If eligible, contact IPvanish support for a refund within the 30-day money-back guarantee period.
- Check for Confirmation: Ensure you receive an email confirming your cancellation.
2. Canceling via Email
If you prefer to cancel via email:
- Compose Your Request: Send an email to IPvanish’s customer support (e.g., support@ipvanish.com).
- Include Required Details: Provide your full name, email address associated with the account, and the reason for cancellation.
- Request Confirmation: Ask for a confirmation email once your cancellation is processed.
- Follow Up: If you don’t receive a response within a few days, follow up or use another cancellation method.
3. Canceling via Customer Support
If you encounter issues or prefer direct assistance:
- Contact IPvanish Support: Use the live chat feature on the IPvanish website or call their customer support line.
- Provide Account Details: Have your subscription ID, email, or payment details ready for verification.
- Request Cancellation: Clearly state your intent to cancel and ask for confirmation.
- Save Confirmation Details: Request an email or reference number for your records.
4. Canceling Through App Stores
If you subscribed via the Google Play Store or Apple App Store:
Google Play Store (Android):
- Open Google Play Store: Launch the app on your Android device.
- Go to Subscriptions: Tap your profile icon and select Payments & Subscriptions > Subscriptions.
- Find IPvanish: Locate the IPvanish subscription in your list.
- Cancel Subscription: Tap Cancel Subscription and follow the prompts.
- Receive Confirmation: Google will send a confirmation email for your records.
Apple App Store (iOS):
- Open Settings on Your Device: Tap your Apple ID and go to Subscriptions.
- Locate IPvanish: Find the subscription in your active list.
- Cancel Subscription: Tap Cancel Subscription and confirm the cancellation.
- Confirmation Email: Apple will email you to confirm the cancellation.
5. Canceling During the Free Trial
If you’re using a free trial:
- Check the Trial End Date: Log into your IPvanish account or app store to verify when the trial ends.
- Cancel Before Renewal: Use the steps above for your platform to cancel before the trial converts into a paid subscription.
- Verify Cancellation: Ensure you receive confirmation to avoid unexpected charges.
6. Requesting a Refund
If you’re eligible for a refund:
- Check Refund Eligibility: Confirm that you’re within the 30-day money-back guarantee period.
- Contact Customer Support: Reach out to IPvanish support via chat or email to request a refund.
- Provide Necessary Information: Share your subscription ID, payment method, and reason for the refund request.
- Monitor Refund Status: Refunds typically take a few business days to process.
Cancel Your IPvanish Subscription with Unsubby
Canceling subscriptions can be time-consuming, especially when navigating multiple platforms or policies. That’s where Unsubby comes in. Unsubby is a trusted subscription cancellation platform designed to simplify the process of cancel IPvanish subscriptions.
By using Unsubby, you can submit your cancellation request online, and our team will handle the rest. From contacting IPvanish to confirming your cancellation and requesting refunds, Unsubby ensures a hassle-free experience. Save time and avoid stress by letting Unsubby handle your IPvanish subscription cancellation.
Things to Consider Before Canceling
Before finalizing your cancellation, keep these points in mind:
- Renewal Dates: Cancel before the next billing cycle to avoid being charged.
- Refund Policy: Refunds are only available within the first 30 days for eligible plans.
- Service Access: Canceling stops future renewals, but you can continue using IPvanish until the end of your current billing period.
Alternatives to IPvanish
If you’re canceling IPvanish but still need VPN services, consider these popular alternatives:
- ExpressVPN: Offers high-speed servers and strong security features.
- NordVPN: Known for its extensive server network and robust privacy tools.
- CyberGhost: Provides easy-to-use VPN features and specialized streaming servers.
- ProtonVPN: Offers a free plan with secure encryption for basic browsing needs.
Evaluate these options to find the best fit for your VPN requirements.
Common Questions About Canceling IPvanish Subscriptions
Can I Cancel Anytime?
Yes, you can cancel IPvanish at any time. To avoid additional charges, ensure you cancel before your renewal date.
Will I Be Charged After Canceling?
No, once you cancel, you won’t be charged for future billing cycles. However, charges already incurred may not be refunded unless eligible under their refund policy.
How Do I Confirm My Cancellation?
You’ll receive a confirmation email or notification once your subscription is successfully canceled. Retain this for your records.
Can I Reactivate My Subscription?
Yes, you can reactivate your IPvanish subscription at any time by logging into your account and selecting a new plan.
Does Canceling Delete My Account?
No, canceling your subscription only stops payments. Your account and data remain intact unless you request full account deletion.
Tips for a Smooth Cancellation Process
- Cancel Early: Start the process a few days before your renewal date to avoid last-minute issues.
- Save Documentation: Keep all cancellation confirmations and correspondence for future reference.
- Monitor Billing Statements: Verify that no further charges occur after canceling.
Canceling your IPvanish subscription doesn’t have to be complicated. With this guide and the support of Unsubby, you can efficiently manage the process and explore alternative VPN options as needed.